
Text Element
Content Tab
Use the text element for creating text blocks in your proposal. You can place merge variables anywhere in the text element that will merge information from the account, contact or user into the final version of the proposal.
Settings Tab
- Typography Settings
Allows you to edit the vertical height of each line in the text element. - Layout
Allows you to split the same body of text between multiple columns within the same element. - Background Image
Allows you to place a background image behind the text block. - Block Element
Standard Block Element settings which include background color, border settings, margin and padding space elements. - Conditions (Available in Proposal Templates and not in Proposals)
Set conditions which determine if the text element will display on a proposal created from the template.
Image Element
Content Tab
Use the image element to insert an image into your proposal. Choose an image from files you previously uploaded to the file manager or upload one from your computer directly to the element. Check the Enable on-click URL and enter a valid URL to have the image link to a specific web page. Click the Settings tab to resize, reposition or change the background of the image.
Settings Tab
- Image Settings
- Width and Height allows you to resize the element to specific sizes.
- Resize to fit on mobile toggle will make sure the image appears correctly on different screen sizes.
- Image Link will make so that when users click the image, a new tab will be open with its link.
- Image alt text is how screen readers will describe the image. (Always add alt text whenever you add a link on the previous field).
- Image alignment allows you to choose between left, center and right alignment for the image.
- Width and Height allows you to resize the element to specific sizes.
- Block Element
Standard Block Element settings which include background color, border settings, margin and padding space elements. - Conditions (Available in Proposal Templates and not in Proposals)
Set conditions which determine if the image element will display on a proposal created from the template.
Video Element
Settings Tab
You can embed videos in your proposal. The videos must be hosted on youtube, wistia loom or vimeo.
You can get the embed code from youtube by clicking on the share link for the video and then the embed code icon:
You can adjust some of the settings of how the video is displayed by modifying the embed code settings. When you are done, click the Copy button and then paste into the Settings of the Video Element in the proposal editor. You can also control which image shows in the printed pdf in the Video Element settings.
The video will be embedded right on the proposal and will play on the proposal without opening another tab.
- Conditions (Available in Proposal Templates and not in Proposals)
Set conditions which determine if the video element will display on a proposal created from the template.
Attachments Element
Use this element to place file attachments directly in the body of the proposal. You can add images, PDFs and other types of files as attachments to your proposal body. You can add up to 6 attachments per attachment element and you can add as many attachment elements to the proposal body as you want.
By clicking on the Settings tab, you can change the font, background/border and conditions to display the attachments element.
Layout Grid Element
The layout grid is a different element than all of the other ones available. It allows you to create multi-column layouts to place elements however you see fit. After you have the layout grid added to your proposal, you'll be able to place elements in the columns just like you are with the proposal itself.
Settings
- First Row of Settings will affect the layout grid entirely. You're able to choose how many columns and rows your layout grid will have, padding, margin, border and background color for the entire layout grid as a whole.
- Each subsequent setting row will affect the specific column. It's important to note that the sum of all the column's widths must be 100%.
- Conditions (Available in Proposal Templates and not in Proposals)
Set conditions which determine if the layout grid element will display on a proposal created from the template.
Example
Table Element
The table element allows you to quickly create a table with editable text elements in each cell. You can make a table with up to 3 columns and 100 rows. You have complete control over the formatting of each column and row.
The table also has controls on the editor panel.
To edit any cell, simply click on the pencil icon in the cell.
To reorder rows, grab the three line icon on the left and hold down the mouse and drag the row where you want it.
Clicking the three dot icon on the right side of the table will display a menu that allows you to adjust the settings for an entire row, insert rows, delete rows, and duplicate rows.
- Conditions (Available in Proposal Templates and not in Proposals)
Set conditions which determine if the table element will display on a proposal created from the template.
Quote Table Element
The quote table contains the pricing and products/services offered in your proposal. There can be multiple quote tables in each proposal or proposal template.
You can add products that you have previously created, or you can create new products right from the quote table editor. You can search for a product to add by name or you can use the advanced search tool to find products by any attributes like price or tags.
Margin and cost are displayed both at the product level and at the overall quote level. These fields are not displayed on the proposal that is sent to your contacts and only users with Product View permissions will see these fields when editing a quote element.
You can save a quote table as a saved template and all of the products and settings inside the quote table will also be saved and reused in other proposals.
Image and Text Element
This element is a simple combination of both the image and text elements into one easily formatted element. Use the image and quote element to place an image with accompanying text or caption into your proposal. Click the settings tab of the image and text element to specify the relative positioning of the image and text.
Settings Tab
- Image & Text
- Image Link will make so that when users click the image, a new tab will be open with its link.
- Image alt text is how screen readers will describe the image. (Always add alt text whenever you add a link on the previous field).
- Image alignment allows you to choose between left, center and right alignment for the image.
- Text width allows you to choose how large the text part of the element is in comparison to the image part of the element
- Image Link will make so that when users click the image, a new tab will be open with its link.
- Typography
- Font Family, size and font-style allows you to change the standard styles for the text part of the element
- Line height allows you to edit the vertical height of each line in the text element.
- Block Element
Standard Block Element settings which include background color, border settings, margin and padding space elements. - Conditions (Available in Proposal Templates and not in Proposals)
Set conditions which determine if the image and text element will display on a proposal created from the template.
Horizontal Line Element
Use the horizontal line element to insert a horizontal line into your proposal. You can also use it to add spacing by setting the line border to 0px.
- Divider Style
Allows you to change the color and thickness of the horizontal line. - Block Element
Standard Block Element settings which include background color, element border settings and top and bottom padding. - Conditions (Available in Proposal Templates and not in Proposals)
Set conditions which determine if the line element will display on a proposal created from the template.
Customer Input Fields Element
Customer Input Fields are a way for you to collect information from customers or users on your proposal. You can add unlimited customer input fields to a proposal. Each input field must be assigned to a user or contact to complete. Input fields can be added to both proposals and proposal templates. Fields added to proposal templates will have the Select Contact for Input Field grayed out and inactive.
You can control the font of all of the input field text that gets displayed on the proposal, including the label, placeholder, and description.
- Conditions (Available in Proposal Templates and not in Proposals)
Set conditions which determine if the customer input field element will display on a proposal created from the template.
Currently, there are three types of input fields — Text, Text area and File Upload. The file upload customer input field is used when you want to collect information from your customer contacts like a Purchase Order. Settings for input fields determine the width and alignment of the fields on the proposal.
You can map input fields to existing proposal fields and the values collected from the contact/user on the proposal will be populated into the existing proposal field. If the mapped proposal field has an existing value, it will be overwritten by the value collected on the proposal.
Input fields can be required or not required. Fields that are not required will not be included in the Next actions on the proposal reader, so be sure to place them in a visible section of the proposal so the contact/user will see them without using the Next button. Required fields will be marked with a red * on the reader and will be included in the Next button actions and must be completed before the proposal is marked as complete.
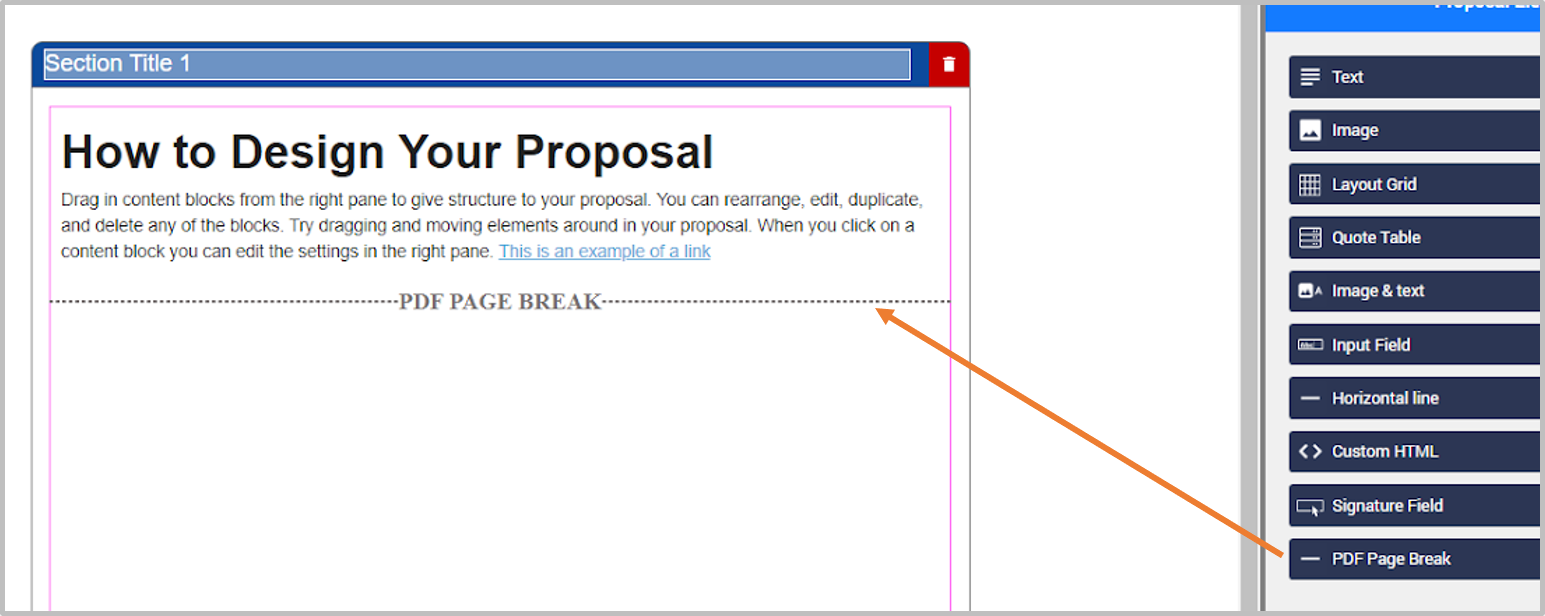
PDF Page Break Element
You add a PDF Page Break element anywhere in your proposal or template to force the start of a new page in the proposal PDF. This does not affect the HTML version of your proposal in the proposal reader — only the PDF version.
Custom HTML Element
Use the custom HTML element to insert a block of custom HTML into your proposal. This is recommended only for advanced users with knowledge of HTML and CSS.
You can even use CSS frameworks like Bootstrap in it by using CDNs or hosting the CSS files yourself. We do not however allow script tags.
- Conditions (Available in Proposal Templates and not in Proposals)
Set conditions which determine if the custom html element will display on a proposal created from the template.
Signature Element
Use the signature field element to place an e-signature field into your proposal. You can add a signature field element to a proposal template, but it will not be editable until you create a proposal from the template.
You can select multiple users or contacts that you would like to e-sign the document. Only the contacts associated with the account are available for selection, and all active users are available.
You can have multiple signature field elements in a proposal.
By clicking the Settings tab while editing the signature field element, you can toggle title, company name and date fields on/off, chose the font for the signature field labels and chose the text for the signature field labels.
Content Tab
Here you'll choose the relevant users and contacts to this proposal. If you have selected multiple contacts to sign the proposal, you can select whether all of the contacts must sign, or any of the contacts can sign.
Settings Tab
By clicking the Settings tab while editing the signature field element, you can toggle title, company name and date fields on/off, chose the font for the signature field labels and chose the text for the signature field labels. You can also choose full signature or Initials Only. If Initials Only is selected, then the Title, Company Name, and Date toggles become grayed out and not editable because these fields do not display for Initials Only.
- Conditions (Available in Proposal Templates and not in Proposals)
Set conditions which determine if the signature element will display on a proposal created from the template.
Saved Template Element
You can insert a saved template anywhere into a proposal with the Saved Template element. Simply drag and drop the Saved Template Element where you want it in the proposal and then select the template you want to insert.